How to remove Search Marquis browser redirect virus from Mac

Mac threats aren’t nearly as marginal as you might have thought. Adware, banking Trojans, rogue anti-spyware, and ransomware tailored for macOS are out there waiting for users to make wrong decisions and install them. A particularly widespread species of these baddies is represented by Search Marquis, a browser hijacker that overrides user-defined Internet settings and drives web traffic to Bing.
Table of Contents
What is Search Marquis Mac virus?
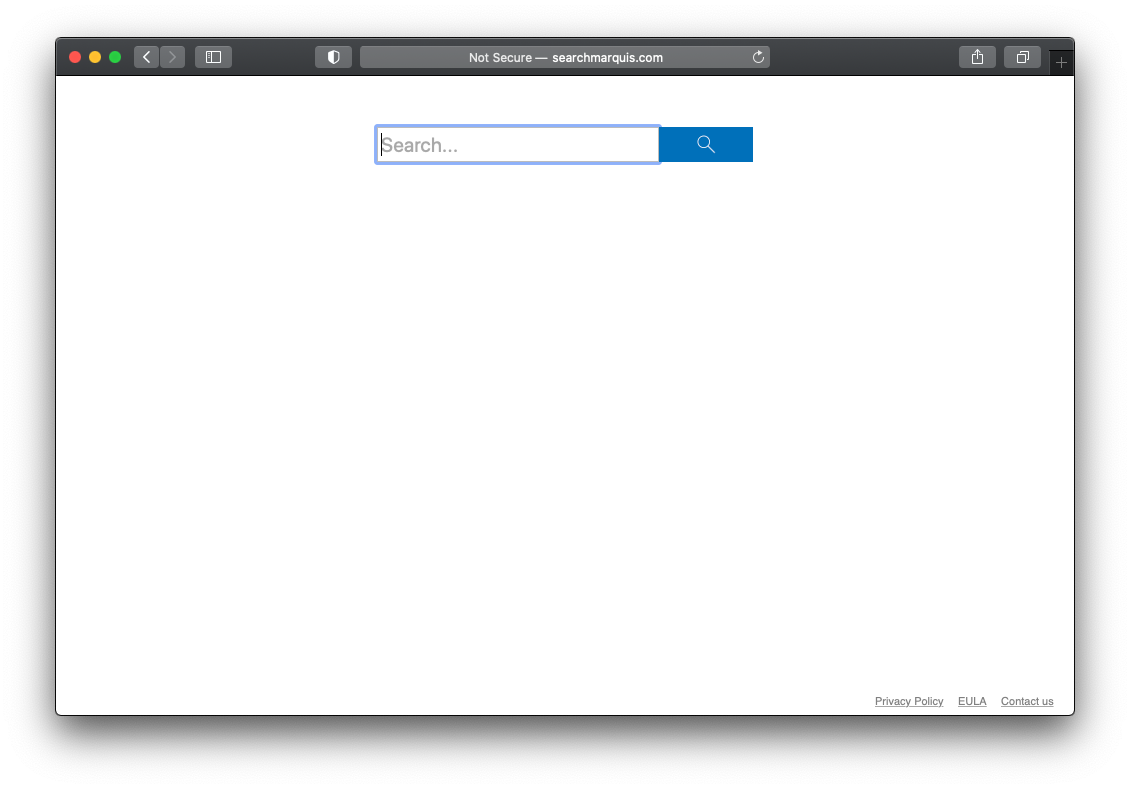
Search Marquis is a strain of Mac adware that deprives its victims of the prerogative to put browsing preferences into effect. It uses several layers of persistence to specify rogue Internet surfing defaults, thereby forcing hits to SearchMarquis.com non-stop. The redirect occurs whenever the user tries to do a Google search via the URL area, opens a new tab, or clicks regular links in search results. The destination point of this scheme, though, is a resource whose legitimacy is out of the question. Believe it or not, it’s Bing. The reasonable question is, what on earth is the role of Microsoft’s search engine in one of today’s top traffic reorganization stratagems haunting Macs?
The most plausible theory has nothing to do with high-profile conspiracy. It comes down to spicing bad activity with something people trust to make the resulting flavor not so bitter. Here’s a seasoned cybercrook’s train of thought in this regard: it doesn’t matter to the average victim if their browser is taken over and keeps resolving suspicious URLs as long as Bing is the landing page. It makes sense, but users are getting smarter and vigilant enough to identify a hoax like that. The first red flag is SearchMarquis.com itself, which shows up in Safari, Google Chrome, and Mozilla Firefox incessantly. Secondly, the path of the redirect includes additional suspicious domains such as
- searchbaron.com
- mybrowser-search.com
- api-lisumanagerine.club
- searchitnow.info
- searchsnow.com.
Furthermore, it’s hard to imagine a situation where a Mac user turns a blind eye to the fact that their default search provider, new tab page, and possibly the homepage are replaced with a service they never specified in the settings, even if it’s as reputable as Bing.com. With all that in mind, the “clever” plan of Search Marquis operators doesn’t appear so clever. But these folks couldn’t care less, with their campaign beating all known records in terms of longevity. It has been around for almost two years and keeps going strong now in 2021. Monetization of the illicitly gained Mac access explains why this “business model” is flourishing. Each instance of browser forwarding resolves APIs of advertising networks, hence profit for the light-fingered marketers behind the fraud.
One more symptom of this attack is the emergence of pop-ups saying, “Your computer is low on memory”. Normally, this alert is displayed when a Mac is running out of available RAM, which is a common outcome of running multiple instances of resource-intensive apps at the same time. But in this case, it is a noxious byproduct of adware activity that causes abnormal response of the system or tries to dupe the user into installing a fake optimization tool. The latter will bilk the victim for a registration fee to fix allegedly detected performance problems.
Search Marquis is a stubborn threat. Having slithered into a Mac, it establishes and maintains persistence at several levels. The most impactful trick involves a configuration profile that seizes control of the default web browser’s settings. Another element of the foul play boils down to adding a new entry to the Login Items list. The pest also sprinkles its files across the system, including LaunchAgents and LaunchDaemons folders. Therefore, to make it vanish you need to find every fragment of the infection and remove Search Marquis virus from your Mac. Read the following how-to to learn how.
Search Marquis removal from Mac – manual steps
If the Search Marquis redirect is running amok inside your Mac, this section will guide you through removing the malicious app along with its core files and components.
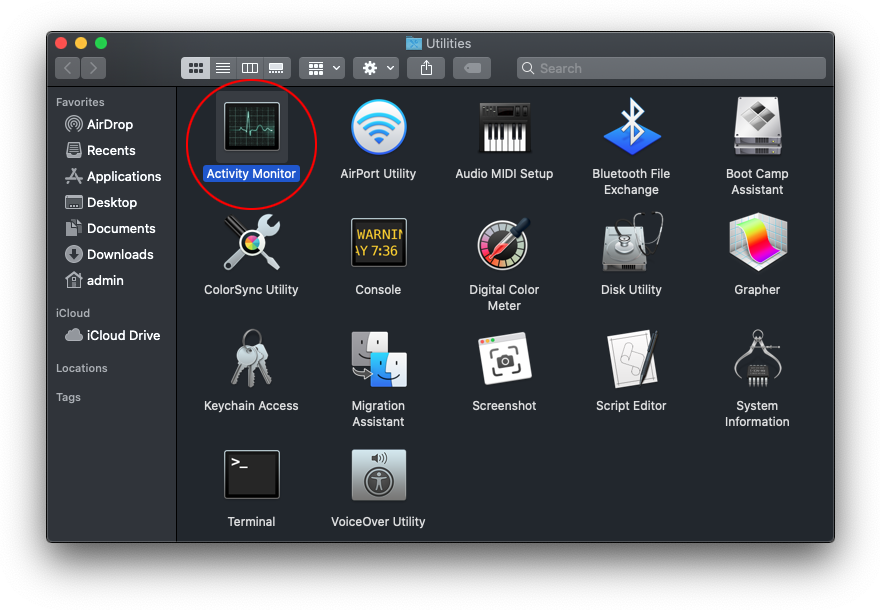
- Click the Go button in the menu bar and select Utilities.

- Once the Utilities screen appears, select Activity Monitor.

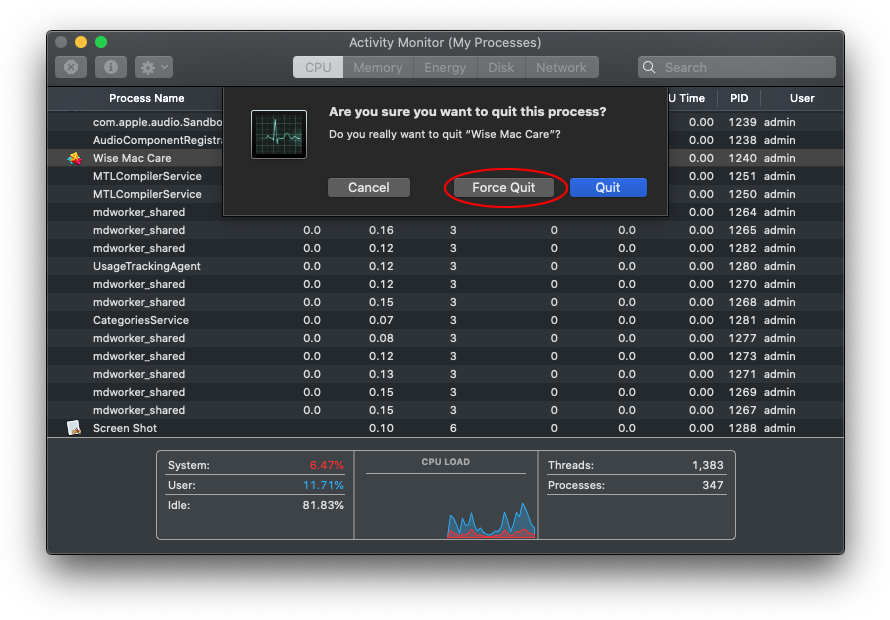
- Sift through your running processes and try to detect the malicious one. Several common giveaways are high CPU usage, suspicious name, and an unfamiliar icon next to an entry.
- If you spot the unwanted item, select it and click the X button (it’s the leftmost one in the upper toolbar). Then, use the Force Quit option to stop the binary as shown below.

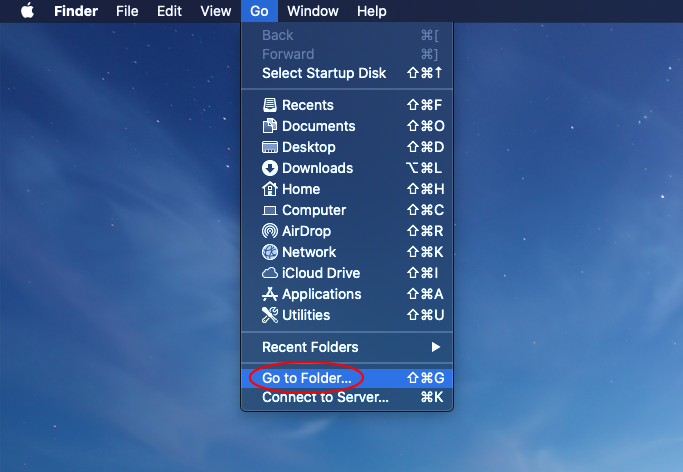
- Pull down the Go list in your menu bar again and choose Go to Folder.

- Enter ~/Library/LaunchAgents (include the tilde symbol) and click Go.

- Examine your LaunchAgents folder to spot dubious-looking files. Move them all to the Trash.

- Follow the same procedure to open ~/Library/Application Support, /Library/LaunchDaemons, and /Library/LaunchAgents folders in turn. Check them for traces of malware and delete everything suspicious you can find.
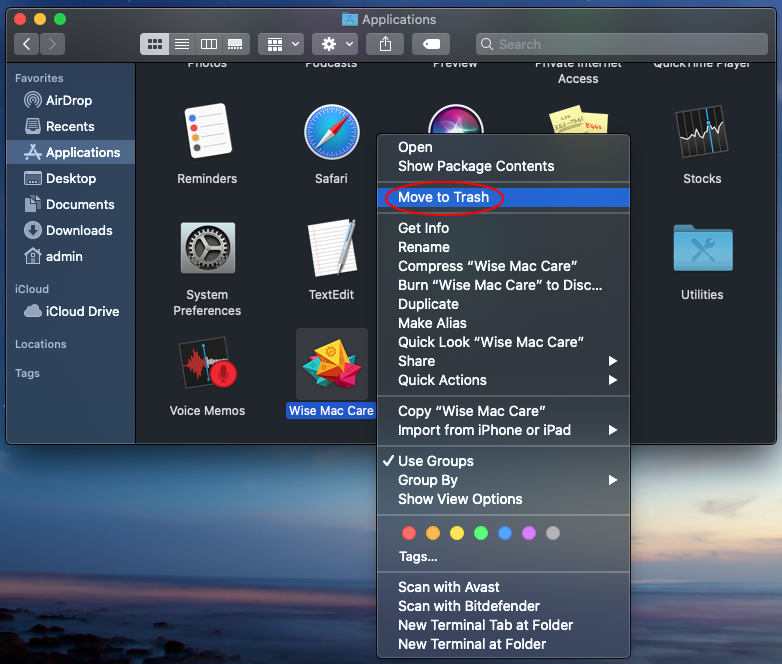
- Open the Finder from your Dock and select Applications in the sidebar. Look for recently installed malicious software and move it to the Trash.

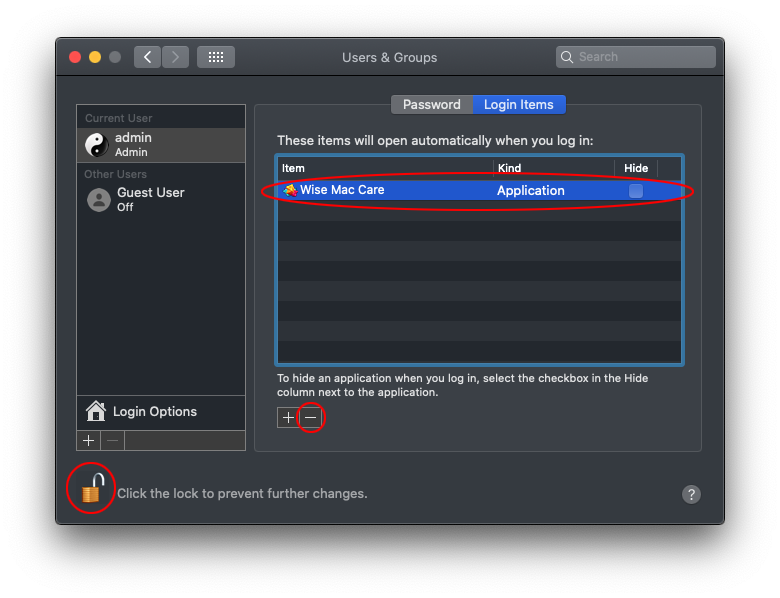
- Click the gear pictogram in the Dock to open the System Preferences app and select Users & Groups. Click the lock symbol and enter your Mac admin credentials to be able to change settings. Then, click the tab that says Login Items in the upper part of the screen, select the unwanted app, and hit the minus symbol to remove it from the list of startup processes.

- Click the backward arrow to return to the System Preferences main pane and select Profiles (this item may not be there if the malware hasn’t created a device profile). Spot the malicious profile and use the minus sign to get rid of it. Enter your admin password to complete the procedure when prompted.

- Empty your Trash folder.
Set your web browser free from Search Marquis redirect virus
Uninstalling the malware itself and deleting its breadcrumbs is very important, but there is one more thing you need to do. To keep your browser from being rerouted to SearchMarquis.com, make sure you clean up its settings and purge rogue data that may lurk in the caches and history logs.
1. Remove Search Marquis from Safari
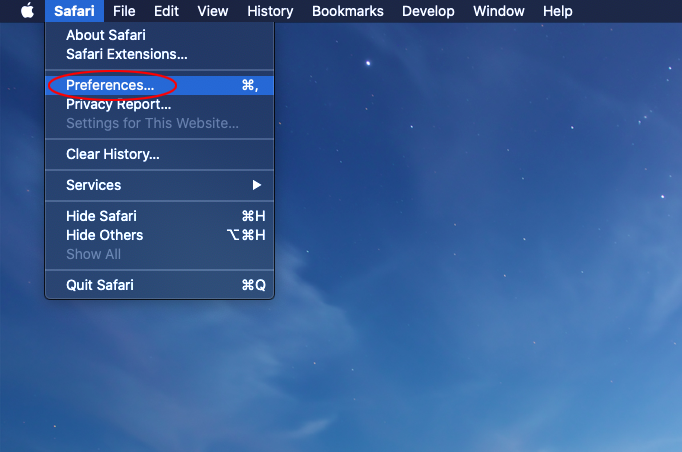
- Open Safari, expand the Safari menu in the upper toolbar, and click Preferences.

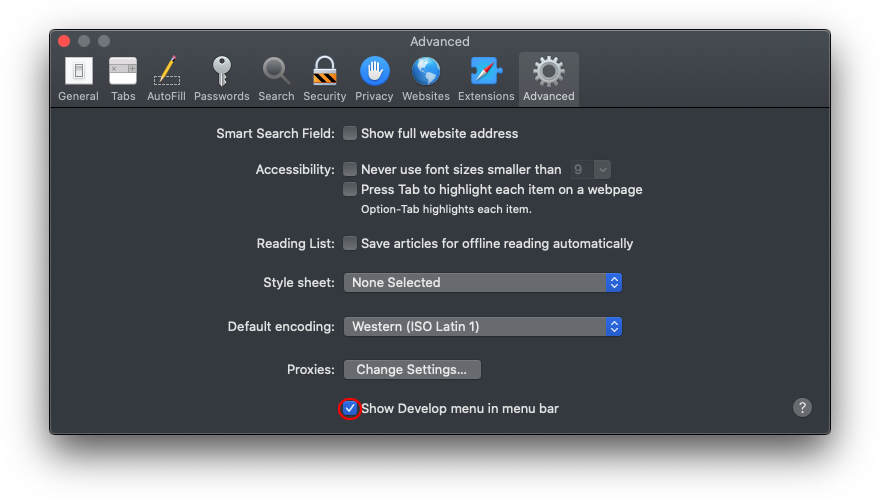
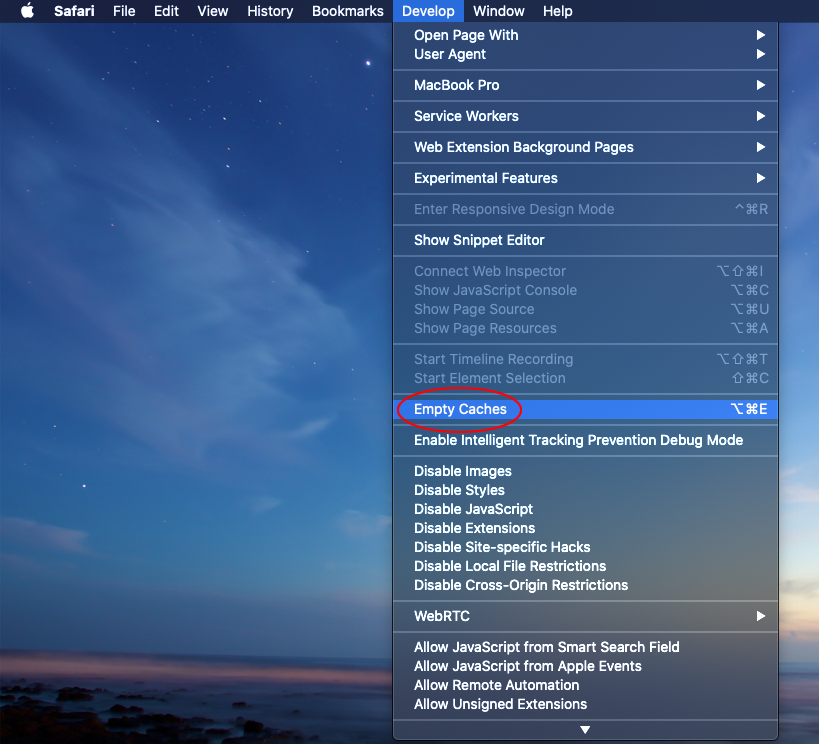
- Select Advanced and enable the option that says Show Develop menu in menu bar.

- Once the Develop menu appears, expand it and select Empty Caches.

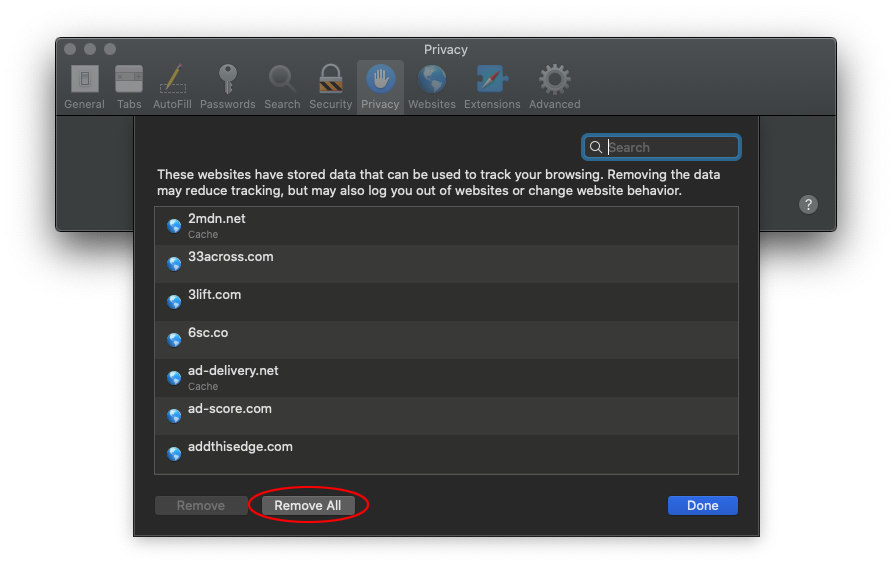
- Go back to Safari Preferences and select the Privacy tab. Then, click Manage Website Data and use the Remove All button to confirm the action.

- Click History in the menu bar and select Clear History. This feature wipes cookies and other website-related information that may be causing issues. Keep the “all history” option enabled in the dialog and click the Clear History button (see screenshot below).

- Restart Safari.
2. Remove Search Marquis redirect from Google Chrome
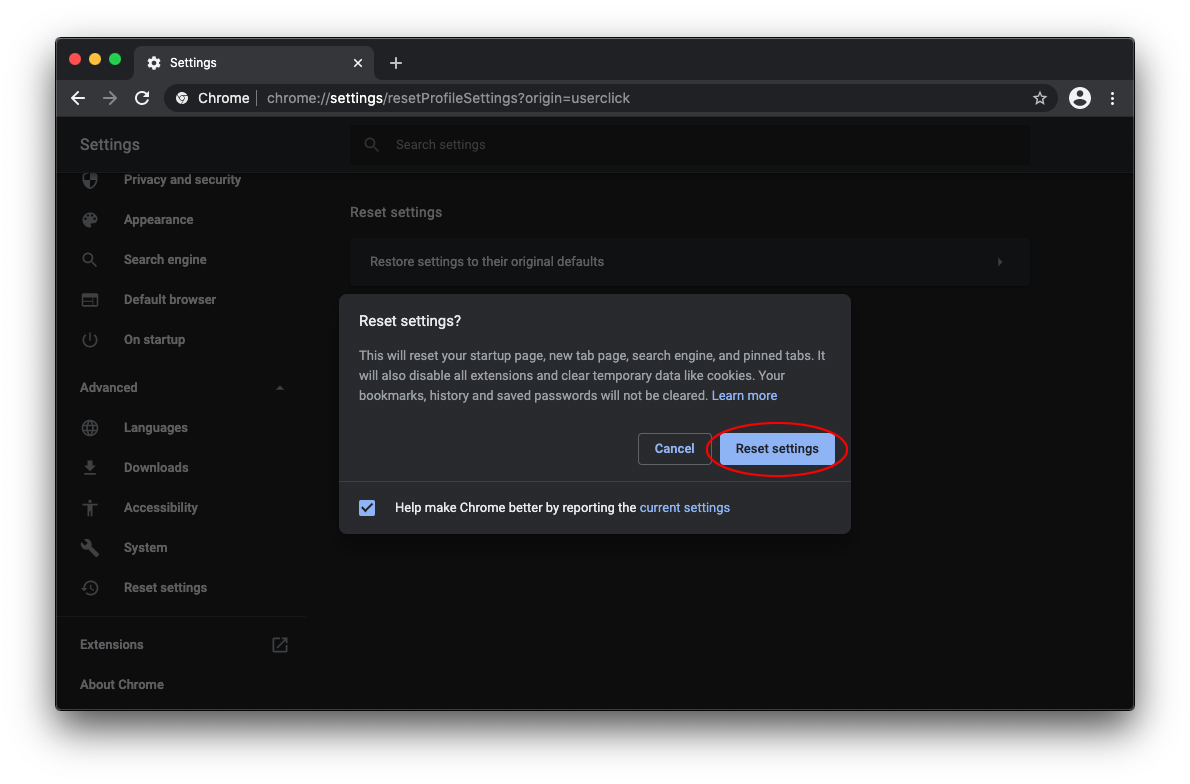
- Click Customize and control Google Chrome (the three dots button at the top right), select Settings, go on to Advanced, and click the button that says Reset settings.
- Select the Restore settings to their original defaults feature and confirm by clicking the Reset settings button in the dialog box.

- Restart Chrome.
3. Remove Search Marquis from Mozilla Firefox
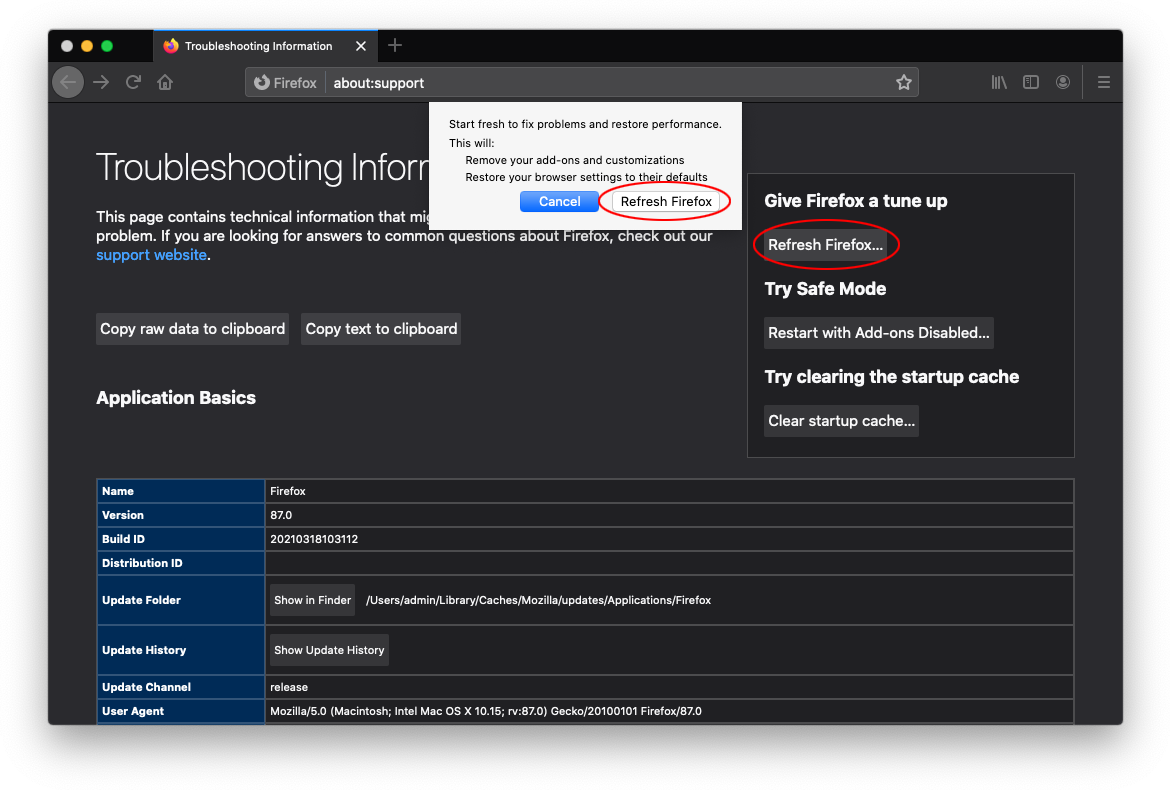
- Open the in-app Firefox menu, click Help, and select Troubleshooting Information.
- Click Refresh Firefox in the Give Firefox a tune up section and confirm that you want to start fresh with the browser.

- Restart Firefox.
Don’t let adware ruin your Mac experience
Hopefully, this guide was helpful and you are no longer stuck in the vicious circle of browser redirecting via SearchMarquis.com. There is one more thing to bear in mind – prevention. Vigilance is the main prerequisite for avoiding such threats. Most of them arrive in bundles that seem harmless on the outside but hide potentially unwanted applications or dangerous Mac malware. So, mind what you install, always opt out of the “express” option in installers, and ideally, stick to the official App Store that hosts software from verified developers.
Posted in: KnowledgeBase
Leave a Comment (0) ↓
