Remove Techsnab (chromelauncher.exe) adware

SoftwareBundler:Win32/Techsnab, also known as Adware/Techsnab, is a malicious program tasked with a number of disruptive functions. It promotes other threats onto a computer by leveraging a surreptitious drive-by technique and installs unwanted components in web browsers, mostly ones built with the Chromium open-source project, thus enabling ad injection as well as the changes of default Internet settings.
The interesting thing about Techsnab is that it infiltrates into PCs as part of the recommended setup configuration accompanying free applications, and its further post-infection activity on the machine also drags PUPs, or potentially unwanted programs, through a similar bundling tactic. Given the growth of adware over the course of the past few years, the basic security trainings should include a whole separate chapter on preventing these threats, advising users not to leave the express setup feature in its default state when freeware solutions are being installed. The devil is in the detail, and the recommended options can conceal a few pieces of malware at a time. This is how the Techsnab adware commences its crusade on systems – it gets in along with an entirely different product while the user believes the chosen utility has got no company.
Again, Chrome users are the primary targets of this infection. When operating inside an OS, it configures the browser to trigger automatic downloads of viruses like GetPrivate or rogue updates, in particular the Chrome Launcher applet. This one runs as chromelauncher.exe, and it deploys multiple unwelcome actions once installed. It may, for instance, integrate new persistent extensions or plugins in the browser which badly affect the victim’s online routine. One of the side effects of this misbehavior is obnoxious popups that randomly appear as the user is viewing pages. The adware is likely to serve superfluous ads, including coupons, banners and inline text. As opposed to the commonplace bundling hoaxes where you can opt out of excessive stuff if you look closely, the promotions conducted by Techsnab mainly do not provide such an option. Users don’t always even get the chance to cancel the setup.
Techsnab has been also reported to recommend bogus Windows 10 updates. Following these prompts is an extremely bad idea because, obviously, you are going to get harmful malware instead. The hurdle about fixing this adware problem is that it may take eliminating multiple infections that might have been installed without your knowledge, including chromelauncher.exe, intrusive add-ons and items that perform user activity tracking. To do it thoroughly, make sure you follow expert-tailored recommendations.
Table of Contents
Techsnab adware automatic removal
The extermination of Techsnab adware can be efficiently accomplished with reliable security software. Sticking to the automatic cleanup technique ensures that all components of the infection get thoroughly wiped out from your system.
1. Download recommended security utility and get your PC checked for malicious objects by selecting the Start Computer Scan option
2. The scan will come up with a list of detected items. Click Fix Threats to get the adware removed from your system. Completing this phase of the cleanup process is most likely to lead to complete eradication of the infection. However, it might be a good idea to consider ascertaining the adware is gone for good.
Remove Techsnab adware using Control Panel
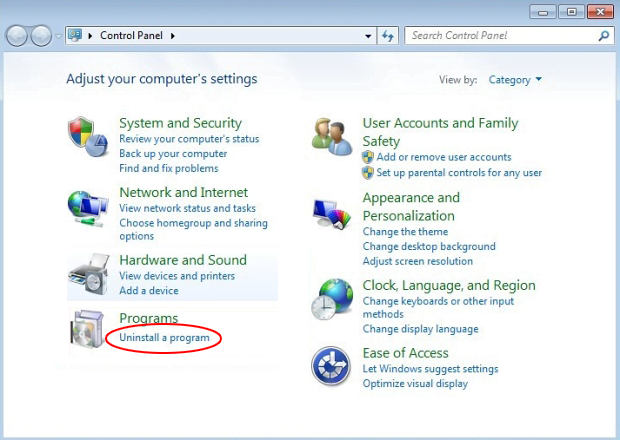
- Open Control Panel. On Windows XP / Windows 8, go to Add or Remove Programs. If your OS is Windows Vista / Windows 7 / Windows 10, choose Uninstall a program

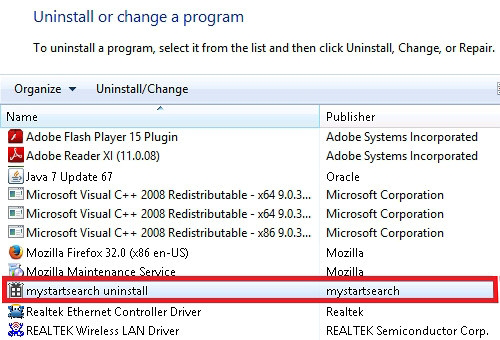
- Look down the list and locate an app that appears fishy. Click the Uninstall/Change (Change/Remove) option to get the intruder removed if spotted

Techsnab adware removal by resetting the affected browser
Please take into consideration that as effective as it is, the procedure of restoring browser defaults will lead to the loss of personalized settings such as saved passwords, bookmarks, browsing history, cookies, etc. In case you are not certain this outcome is suitable despite its obvious efficiency, it’s advised to follow the automatic removal method described in one of the previous sections of this tutorial.
Reset Google Chrome
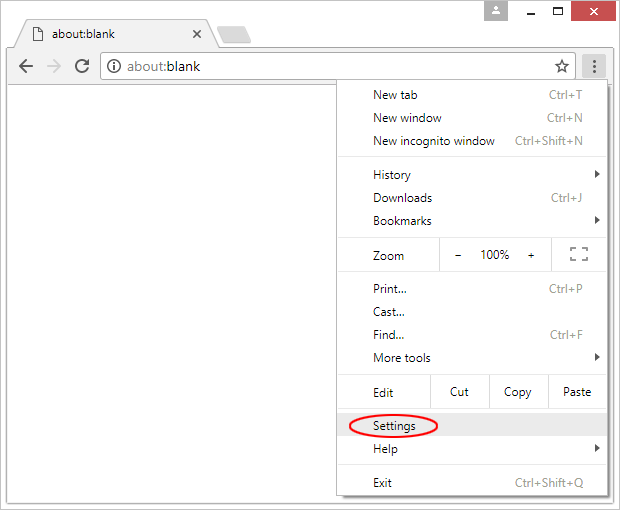
- Click on the Chrome menu icon and select Settings

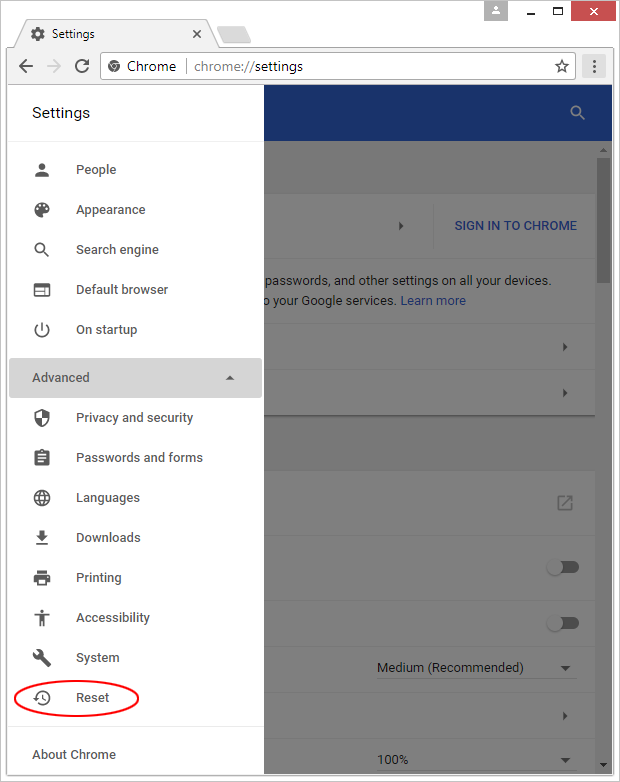
- Locate the Advanced option under Settings and click on it to expand the menu. Then, pick the Reset button at the bottom

- When a new screen appears, hit Reset once again

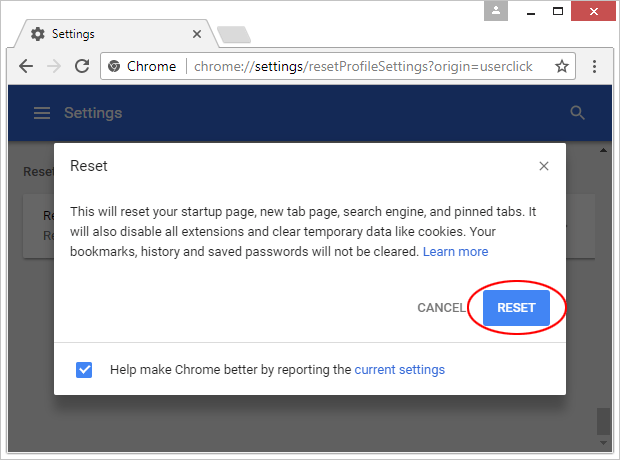
- Chrome will now display a confirmation dialog box listing the types of data that will be lost if you proceed. Read the message carefully and, if you’re sure, click Reset

Reset Mozilla Firefox
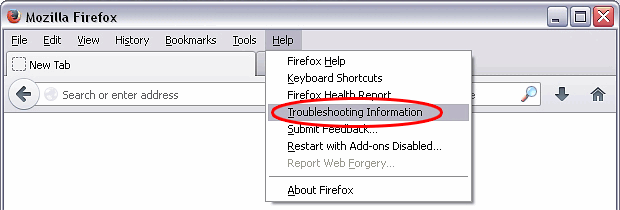
- Click on Help menu and select Troubleshooting Information from the drop-down list, or type about:support in the URL field

- On the Troubleshooting Information screen, click Refresh Firefox option and confirm the procedure on another dialog

Reset Internet Explorer
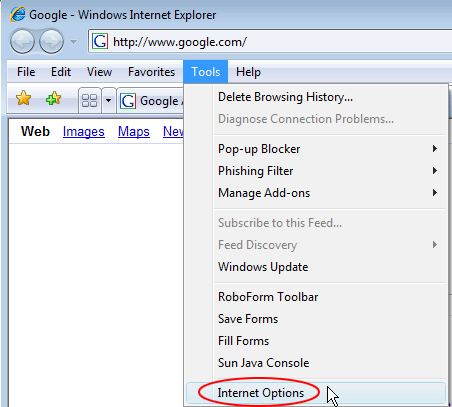
- In IE, go to Tools and select Internet Options from the list

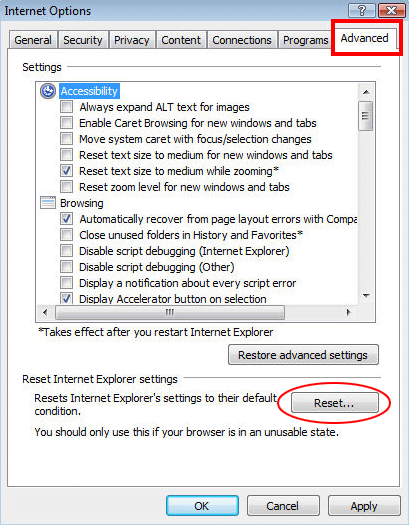
- Hit the Advanced tab and click on the Reset option

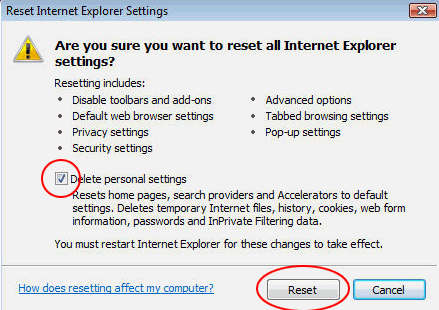
- IE will now display Reset Internet Explorer Settings box, where you should put a checkmark next to Delete personal settings option and click Reset at the bottom

Verify whether Techsnab adware has been completely removed
For certainty’s sake, it’s advised to repeatedly run a scan with the automatic security software in order to make sure no harmful remnants of this adware are left inside Windows Registry and other operating system locations.
Posted in: KnowledgeBase
Leave a Comment (0) ↓

