Remove Ads by GetPrivate (Powered by GetPrivate) from Chrome, Firefox and IE

Undesired effects accompanying potentially useful features of a computer application is not an uncommon occurrence. This sure is better than outright harm, but the pro side of such software is cold comfort to anyone affected. GetPrivate solution delivers free virtual private network functionality, which isn’t bad, but the concomitant influence on PCs, namely the superfluous advertising on web pages, reduces customer satisfaction pretty much down to zero.
GetPrivate, at the very first blush, has got the essentials of the average VPN tool: it streams the user’s traffic via a protected tunnel so that surveillance attempts and man-in-the-middle attacks are rendered vain. It also has an official page online describing the virtues of anonymous web surfing owing to the product. So far so good, but there is no allusion anywhere regarding the cons that the clients inevitably come across. This tool, as it turns out, uses the privilege of modifying LAN properties on a computer to its creators’ mercantile benefit. It thus faces no particular obstacles for ads serving in the host system.
Despite its whole theoretic beauty, the free and allegedly fast VPN connection feature isn’t the marketing catch used by GetPrivate publishers. Users mainly run the risk of catching the bug when they are installing something else. In fact, downloading the app from its website is a no go as it ends up reporting Error 502. All setups are instead secured by third party offers. The range of programs involved in the distribution of GetPrivate is fairly versatile, encompassing data management tools like FileAmigo LE, graphics enhancement and entertainment solutions, as well as driver updates and various system players. The installation clients for the above usually have the custom install option pre-enabled, which implies an automatic setup of affiliated apps.
Once GetPrivate is up and running on the box, it modifies the Internet Protocol preset and thus interferes with the DNS server configuration. These changes allow the program to display arbitrary web content as the victim is surfing the Internet. Most of the time, it triggers new browser tabs that contain some promotional information. The title of these pages is “Powered by GetPrivate”, so it’s easy to tell them from the regular tabs. The adware is known to also inject different advertising components directly into sites as the user visits them. Above is an example thereof – a popup that says “Ads by GetPrivate” and entices the person to click on the button and be further rerouted to an affiliated resource. Every such click and user lead is a paid-for event, which explains the genuine motivation of the people in charge of this campaign.
Be sure to examine the follow-up to this description and use the instruction to completely get rid of the GetPrivate nuisance.
Table of Contents
GetPrivate ads automatic removal
The extermination of GetPrivate adware can be efficiently accomplished with reliable security software. Sticking to the automatic cleanup technique ensures that all components of the infection get thoroughly wiped out from your system.
1. Download recommended security utility and get your PC checked for malicious objects by selecting the Start Computer Scan option
2. The scan will come up with a list of detected items. Click Fix Threats to get the ads removed from your system. Completing this phase of the cleanup process is most likely to lead to complete eradication of the infection. However, it might be a good idea to consider ascertaining the ads is gone for good.
Remove GetPrivate ads using Control Panel
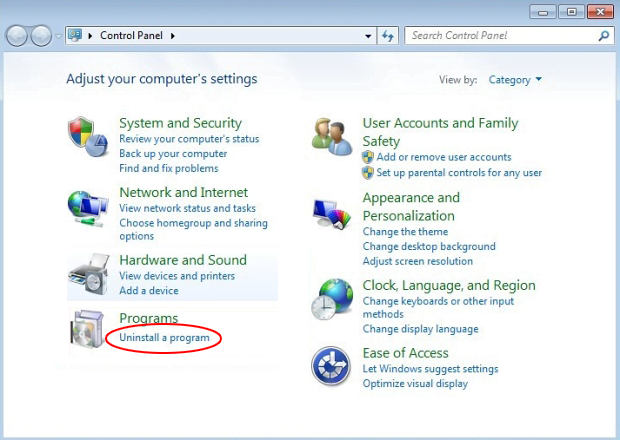
- Open Control Panel. On Windows XP / Windows 8, go to Add or Remove Programs. If your OS is Windows Vista / Windows 7 / Windows 10, choose Uninstall a program

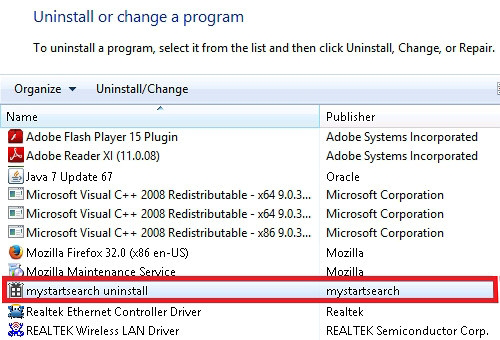
- Look down the list and locate an app that appears fishy. Click the Uninstall/Change (Change/Remove) option to get the intruder removed if spotted

GetPrivate ads removal by resetting the affected browser
Please take into consideration that as effective as it is, the procedure of restoring browser defaults will lead to the loss of personalized settings such as saved passwords, bookmarks, browsing history, cookies, etc. In case you are not certain this outcome is suitable despite its obvious efficiency, it’s advised to follow the automatic removal method described in one of the previous sections of this tutorial.
Reset Google Chrome
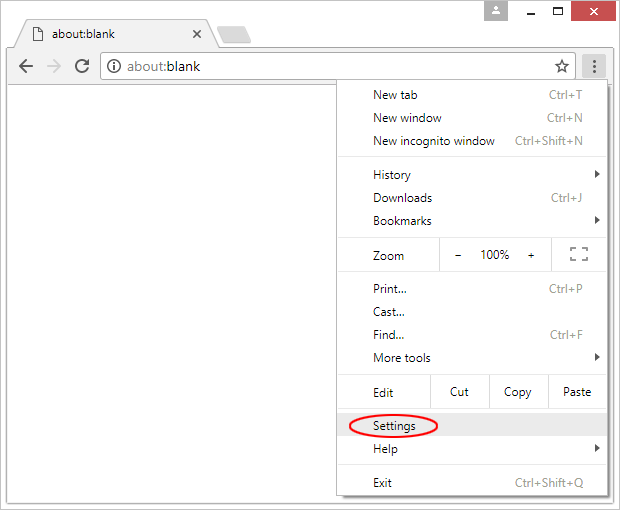
- Click on the Chrome menu icon and select Settings

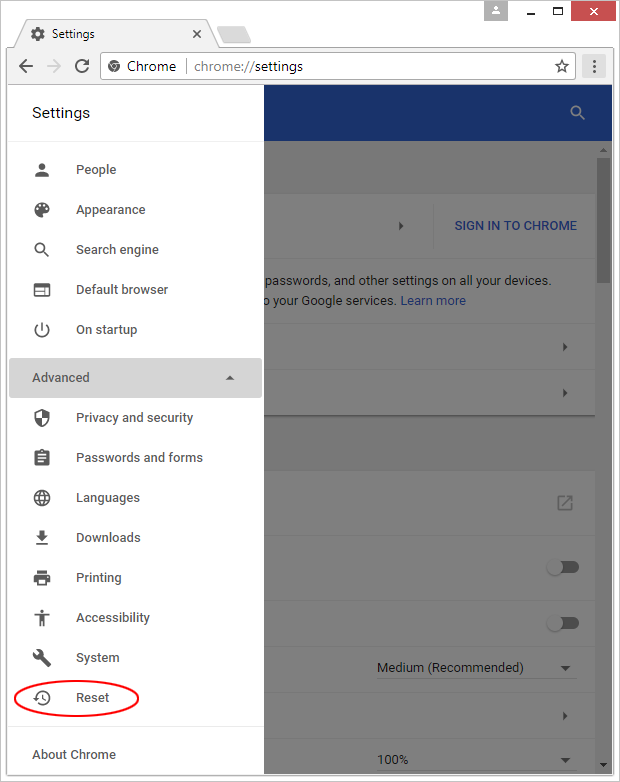
- Locate the Advanced option under Settings and click on it to expand the menu. Then, pick the Reset button at the bottom

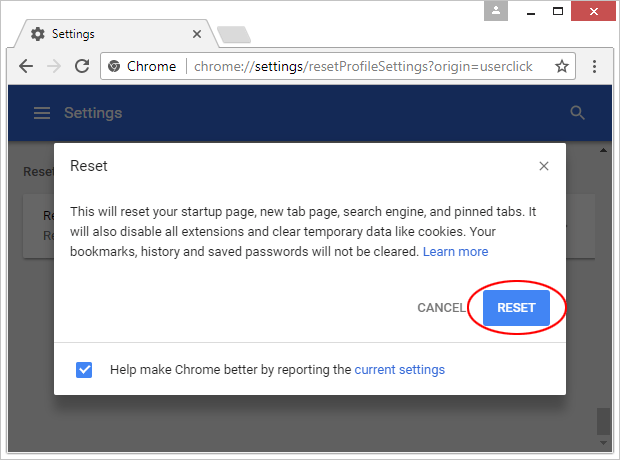
- When a new screen appears, hit Reset once again

- Chrome will now display a confirmation dialog box listing the types of data that will be lost if you proceed. Read the message carefully and, if you’re sure, click Reset

Reset Mozilla Firefox
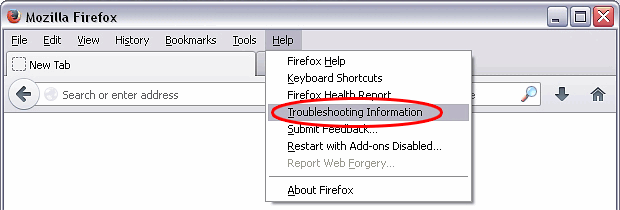
- Click on Help menu and select Troubleshooting Information from the drop-down list, or type about:support in the URL field

- On the Troubleshooting Information screen, click Refresh Firefox option and confirm the procedure on another dialog

Reset Internet Explorer
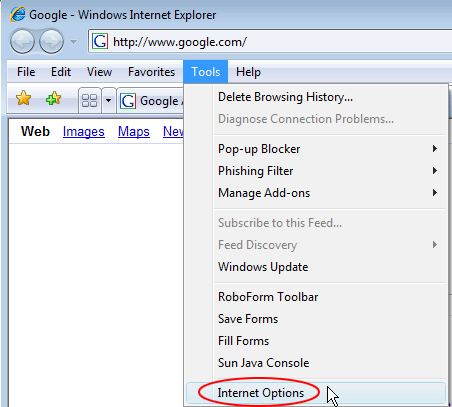
- In IE, go to Tools and select Internet Options from the list

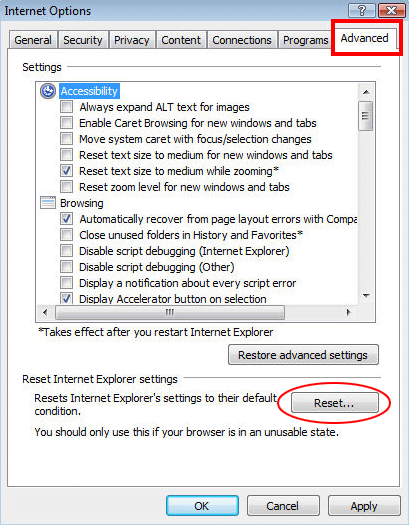
- Hit the Advanced tab and click on the Reset option

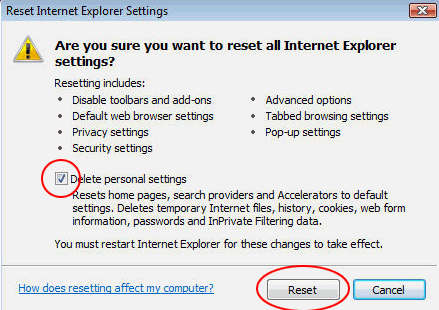
- IE will now display Reset Internet Explorer Settings box, where you should put a checkmark next to Delete personal settings option and click Reset at the bottom

Verify whether GetPrivate ads has been completely removed
For certainty’s sake, it’s advised to repeatedly run a scan with the automatic security software in order to make sure no harmful remnants of this adware are left inside Windows Registry and other operating system locations.
Posted in: KnowledgeBase
Leave a Comment (0) ↓


